For the Birds Card
I saw the card that Amanda Mertz of didyoustamptoday.blogspot.com made with the For the Birds stamp set and just had to CASE it. her card can be seen here: http://didyoustamptoday.blogspot.com/2012/10/birdbath-birthday.html
Mine does not have any stitching otherwise I think it is the same.
Supplies:
Crumb Cake card stock 5
½” x 8 ¼”, (2) ¾”x 4 ½”
First Edition DSP 5
¼” x 4” (front), 4 ¾” x 3 ½” (inside)
Very Vanilla 4
½” x4 ½” x ¼”
Whisper White 3”
x 3”
Island Indigo 4 ½” x 4 ½”
Rose Red scrap
for 1 3/8” circle
Pink Pirouette scrap
for 1” circle
For the Birds stamp set
StazOn Jet Black Ink
Markers Lucky
Limeade, Island Indigo, Rose Red, Pink Pirouette, Tangerine Tango
Circle Punches 1
3/8” and 1”
Heart Punch
Corner Rounder
Windows Framelits
Vintage Trinkets
Opt.: Paper Piercing Tool and Templates
Technique: Color markers onto clear stamp block pick up on a
blender pen to color image
1) Round corners of DSP and Very Vanilla. Punch circles and
punch heart inside circles.
2) Put inside layer together: layer heart (opt: punch a few
more heart from scraps) onto Very vanilla and adhere to inside.
3) Adhere circles to DSP. Cutting off excess if needed. Notch
banner ends and adhere to DSP and trim off excess.
4) OPT: Pierce down the center of the banner and around the
outside edge.
5) Using the piercing tool poke holes for brads. Attach brads
to banners and DSP. Adhere to card base.
6) Stamp image onto Whisper White. Color image using markers
and blender pen. Scribble marker color
onto acrylic stamp block, pick up some of the color on the blender pen and
color image.
7) Using Window Framelits cut out stamped image and use the
next larger size of the Window Framelits to cut out Island Indigo piece.
8) Adhere image to Island indigo. Using Dimensionals adhere to
card front.
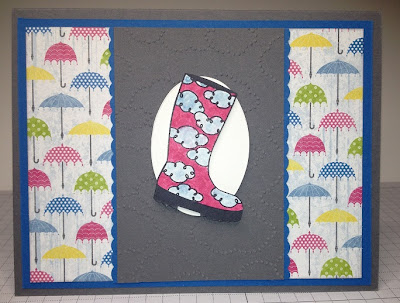
Bootiful Occasions Card
Card Stock
Whisper White 2
of 2” x2 ½” , 4 ½” x 3 ¼”
Basic Gray 2 ½” x 3 ¾”, 5 ½”
x 8 ½” score at 4 ¼”
Pacific Point 5 ¼” x 4, 2 pieces ¾” x 4 ½”
Sunshine and Sprinkles DSP 1 ½” x 3 ½”
Inks /Markers
Staz On Jet Black Ink
Pacific Point marker
Melon Mambo marker
Blender Pens
Stamp Set/s
Bootiful Occasions
Accessories
Scalloped Ribbon Punch
Cloudy Embossing Folder
Extra Large Oval Punch
Technique: Color markers onto clear stamp block pick up on a
blender pen to color image
1) Punch border from 2 pcs. of ¾” x 4 ½” Pacific Point, Extra Large Oval
from 1 piece of2” x 2 ½” of Whisper White.
2) Emboss small piece of Basic Gray with
the Cloudy Day embossing folder.
3) Apply adhesive to long edges of Basic
Gray and adhere Scalloped Ribbon pieces.
4) Adhere DSP to Pacific Point. Adhere to
front of card base.
5) Opt. Stamp large Whisper White and envelope liner with
Pacific Point after stamping off once.
6) Stamp rain boot on remaining piece of
Whisper White, color, and cut out. Adhere boot to oval with Dimensionals.
Adhere this piece to embossed section of card front with Dimensionals.
7) Adhere piece to inside card. Adhere
envelope liner.
Birthday Cake Candle
Card Stock
Scraps ¾” x 6”, 2-scalloped circles, tiny flowers
Accessories
1 ¾” Scalloped Circle
Punch
3/16” circle punch
Teardrop Circles
Nestabilites second smallest
Adhesive
Pearls
Flameless Tealights
Top and bottom templates
( The bottom template will depend on your tealight. you need an opening for the on/off switch. I used a hole punch. For the top template I punched the scallop circle, folded it in fourths and determine how large of an opening you need for the flame.)
1) Adhere 6” strip to the candle.
2) punch bottom scallop circle using
bottom template (to turn tealight on /off). Adhere to bottom of tealight with
glue dots.
3) Apply Punch circle in center of the top
scallop. Using top template and a craft knife cut from the outside of the
template to the circle
4) Punch 4 tiny flowers and adhere flowers
to top with mini glue dots. Add pearls


No comments:
Post a Comment
I would love to hear what you have to say! I am receiving lots of spam/junk comments so unfortunately I have had to turn word verification for comments on.