Sunday, July 7, 2013

Card for Mom


I am going to visit my family…. Had to make a card for my mom!
I used a digi stamp from artist Ruth Davis. Sorry, I don't know which web site it came from. I printed the digi on Stampin' Up Whisper White cardstock and used colored pencils to color the cute house. The patterned paper is Graphics 45 BotanicaBella. I saw a sentiment I really liked somewhere? Could I find it again? NO! So I made my own, 'Home is where your mom is' with the computer for a sentiment on the inside. It doesn't matter how old I am, I always feel like I am in grade school when I give Mom something I've made. AND she still gushes over everything I make. Aren't we silly!


Sunday, June 16, 2013

June Card Chain Challenge

My Card for The Society of Stampaholics June Card Chain Challenge! Whew! that was a mouthful!


All Supplies are Stampin' Up
Cardstock: Whisper White, Pistachio Pudding, Costal Cabana
Inks and Markers: Coastal Cabana, Pistachio Pudding, Rose Red, Cherry Cobbler


Saturday, May 25, 2013

May Stamp Club Projects


Reusable Aviary Card
 
that I fell in love with. Mine is a little different in that I didn't use a sentiment or ribbon slide and I also made it reusable.
 
I used:
Whisper White                                  Aviary stamp set                  
Marina Mist cs                                  Midnight Muse ink
Real Red cs                                      Crumb Cake Ink                  
Metallic/Neutral brads                      Square Lattice TIEF
Clear photo corners                         Bashful Blue ribbon

 
Cut                 Marina Mist             4 ¼ x 11, score at 5 ½
                                                            4 ½ x 2, emboss with Square Lattice TIEF
                        Whisper White        4 x 5, cut Top Note
                                                            4 pieces 3 ¾ x 5

Tip:  Add adhesive to the embossed piece in small patches to avoid tearing.

1) Adhere embossed piece to bottom of card front, trim excess.

2) Apply ribbon with adhesive only in one or two places. Wait to tie the knot.

3) Stamp images. For the hanging cage, draw the line with a marker and a ruler.

4) Add brad to top of the hanging cage.

5) Adhere stamped piece with Dimensionals and tie the knot.

6) Put one photo corner on each of the corners of one of the 3 ¾ x 5 pieces and adhere to the inside of the card. Add the rest of the Whisper White.

7) Adhere small stickers to let recipient know this is a reusable card. I used clear return address labels and placed them on the 3 ¾ x 5 pieces on the   bottom left corner. My sticker reads, “This is a reusable card. Please remove the portion that was meant for you and use this card again.”


Suit Card 

The tutorial for this card can be found here:


Top Note Box

The instructions for this box can be found here:


April Stamp Club cards


Rain Or Shine Card 


 Stamp            umbrellas onto 3x5 Whisper White
                        Sentiment onto lower right of other piece of 3 ¾ x 5 Whisper White

Cut out umbrellas and pop up middle of each.

Arrange umbrellas (DO NOT adhere) and Stamp handles.

Emboss corners of Whisper White.

Adhere         DSP to card base
                        Stamped to DSP

Stamp rain hearts.

Adhere umbrellas with dimensional.


Hello Dear Friend


Punch 8-12 small flowers from Pumpkin Pie and crumple to distress
Show spacing and distressing
 
Opt.   Ink edges of DSP with your choice of ink color. I preferred Real Red.
 
Stamp                        1) Bicycle with Real Red onto one of the 4 ¼ x 3 pcs. of Whisper White using guides on the stamper.
            Opt.   2) Ink up the basket portion of the stamp and press 2x2 Whisper White onto the basket.
                        3) Stamp  bird with Soft Suede onto same 2x2 Whisper White Or stamp directly onto bike handles.
                        4) Stamp bird at the bottom of remaining Whisper White and adhere to inside of card.
 
Opt.   Cut out the bird and the basket. 
 
Adhere:        DSP to card front
                        Red to DSP
                        Stamped piece to Red
 
Opt.   Attach with dimensional scraps:  bird to bike handle bars
                                                                      Basket
 
Arrange flowers and adhere using glue dots.
 
Place a small rhinestone in each flower and a large one on the front bike wheel.


She Believed


There are no instructions for this card. It is pretty straight forward.


Sunday, May 19, 2013

May Card Chain Challenge at Society of Stampaholics


The guidelines are to use one or more of the following: lime green, deep aqua, red-orange; the card sketch, Music  or  Books  or  Sailing/Boats; Stickers  or Dry Embossing. I chose to use the color combo and my version of the sketch.


Sunday, April 21, 2013

March Stamp Club Projects

For the Birds Card
 
I saw the card that Amanda Mertz of didyoustamptoday.blogspot.com made with the For the Birds stamp set and just had to CASE it. her card can be seen here:  http://didyoustamptoday.blogspot.com/2012/10/birdbath-birthday.html
 
Mine does not have any stitching otherwise I think it is the same.
 
Supplies:
Crumb Cake card stock           5 ½” x 8 ¼”, (2) ¾”x 4 ½”
First Edition DSP                      5 ¼” x 4” (front), 4 ¾” x 3 ½” (inside)
Very Vanilla                            4 ½” x4 ½” x ¼”
Whisper White                        3” x 3”
Island Indigo                            4 ½” x 4 ½”
Rose Red                                 scrap for 1 3/8” circle
Pink Pirouette             scrap for 1” circle
For the Birds stamp set
StazOn Jet Black Ink
Markers                                  Lucky Limeade, Island Indigo, Rose Red, Pink Pirouette, Tangerine Tango
Circle Punches                        1 3/8” and 1”
Heart Punch
Corner Rounder
Windows Framelits
Vintage Trinkets
Opt.:  Paper Piercing Tool and Templates
Technique:     Color markers onto clear stamp block pick up on a blender pen to color image
1)         Round corners of DSP and Very Vanilla. Punch circles and punch heart inside circles.
2)         Put inside layer together: layer heart (opt: punch a few more heart from scraps) onto Very vanilla and adhere to inside.
3)         Adhere circles to DSP. Cutting off excess if needed. Notch banner ends and adhere to DSP and trim off excess.
4)         OPT: Pierce down the center of the banner and around the outside edge.
5)         Using the piercing tool poke holes for brads. Attach brads to banners and DSP. Adhere to card base.
6)         Stamp image onto Whisper White. Color image using markers and blender pen.  Scribble marker color onto acrylic stamp block, pick up some of the color on the blender pen and color image.
7)         Using Window Framelits cut out stamped image and use the next larger size of the Window Framelits to cut out Island Indigo piece.
8)         Adhere image to Island indigo. Using Dimensionals adhere to card front.


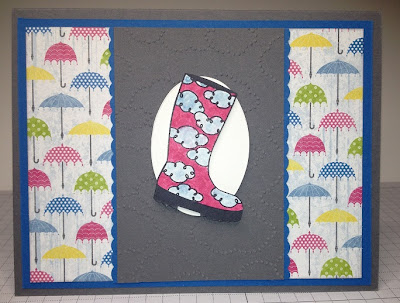
Bootiful Occasions Card


Card Stock
Whisper White                        2 of 2” x2 ½” , 4 ½” x 3 ¼”
Basic Gray                               2 ½” x 3 ¾”, 5 ½” x 8 ½” score at 4 ¼”
Pacific Point                            5 ¼” x 4, 2 pieces ¾” x 4 ½”
Sunshine and Sprinkles DSP    1 ½” x 3 ½”
Inks /Markers
Staz On Jet Black Ink
Pacific Point marker
Melon Mambo marker
Blender Pens
Stamp Set/s
Bootiful Occasions
Accessories
Scalloped Ribbon Punch
Cloudy Embossing Folder
Extra Large Oval Punch
 
Technique:     Color markers onto clear stamp block pick up on a blender pen to color image
1)         Punch border from 2 pcs. of  ¾” x 4 ½” Pacific Point, Extra Large Oval from 1 piece of2” x 2 ½” of Whisper White.
2)         Emboss small piece of Basic Gray with the Cloudy Day embossing folder.
3)         Apply adhesive to long edges of Basic Gray and adhere Scalloped Ribbon pieces.
4)         Adhere DSP to Pacific Point. Adhere to front of card base.
5)         Opt. Stamp large Whisper White and envelope liner with Pacific Point after stamping off once.
6)         Stamp rain boot on remaining piece of Whisper White, color, and cut out. Adhere boot to oval with Dimensionals. Adhere this piece to embossed section of card front with Dimensionals.
7)         Adhere piece to inside card. Adhere envelope liner.
 

Birthday Cake Candle
 
Card Stock


Scraps              ¾” x 6”, 2-scalloped circles, tiny flowers
Accessories
1 ¾” Scalloped Circle Punch
3/16” circle punch
Teardrop Circles Nestabilites second smallest
Adhesive
Pearls
Flameless Tealights
Top and bottom templates
( The bottom template will depend on your tealight. you need an opening for the on/off switch. I used a hole punch. For the top template I punched the scallop circle, folded it in fourths and determine how large of an opening you need for the flame.) 
1)         Adhere 6” strip to the candle.
2)         punch bottom scallop circle using bottom template (to turn tealight on /off). Adhere to bottom of tealight with glue dots.
3)         Apply Punch circle in center of the top scallop. Using top template and a craft knife cut from the outside of the template to the circle
4)         Punch 4 tiny flowers and adhere flowers to top with mini glue dots. Add pearls


Saturday, April 20, 2013

I am a Bad Blogger and February Stamp Club Projects.

Wow! I am 3 months behind...I thought I was only 2 months behind. Time to get caught up and I am going to try to stay there. I hope to be caught up this weekend.

February Stamp Club Projects

Morning Cup Card


inside


Supplies:
Whisper White                                  3 ¼” x 4 ½ “ (inside), 3 ¼” x 2 ½”, small scrap
Crumb Cake                                       5 ½” x 8 ½”
Brights DSP                                         5” x 3 ¾”, 1 ½” x 3 ¾”
Pink Pirouette                                   5 ¼” x 4”, 3 ½” x 2 ¾”, (3) ½” x 5 ¾”
Staz On Jet Black Ink
Crumb Cake Ink
Morning Cup Stamp Set
Tiny Tags Stamp Set
Dotted Scallop Ribbon Punch
Jewelry Tag Punch
Stampin’ Write Markers                                Subtles Collection, Crumb Cake
Dimensionals
Sponge
Ribbon                                                  7”, 4”
1/16” hoe punch

STAMP
Large Whisper White piece—Ink up using Crumb Cake --teapot and cups
Stamp off once and then stamp slightly past the bottom edge of the paper and adhere to inside of card.
Small Whisper White Piece – Ink Stamp with Black. 
Scrap of Whisper White--       friends from the Tiny tags

PUNCH
Pink ( ½” x 5 ¾”)  pieces-- Dotted Scallop Ribbon Punch
Small White Piece-- Jewelry Tag Punch centering the sentiment

ADHERE   
       DSP to pink (large pieces)
        7” Ribbon to back of above and adhere to card base
        Dotted Scallop to both side of remaining DSP and then to card

COLOR 
    Stamped images with markers—use a light touch with water color markers
    Sponge lightly with Crumb Cake around all edges and then heavier under the cups and pot to ground the images 

ADHERE
    Stamped piece to pink and this piece to Dotted Scallop ribbon piece
    Apply to card with Dimensionals


Whole Latte Love


inside


Supplies:
Real Red CS                        4 ¼ “ x 11”, 3” x3”, scrap for flowers
Basic Grey                           4” x5 ¼”, (2) 2 7/8” x 1 3/8”, 1 ½” square for heart
Whisper White                  1 ¼” x 2 ¾”, 3 ¼” x 4 ½”
Print Poetry DSP               1 ¼” x 2 ¾”
Real Red ink
Patterned Occasions Stamp Set
Basic Gray ¼’ Stitched Grosgrain Ribbon, Basic Pearls, Small flower punch, White gel pen, Hearts a Flutter Framelits, Honeycomb embossing folder

STAMP
Large Whisper White piece—Cover sentiment portion of stamp with tape
    Ink stamp and remove tape
    Stamp off on a scrap or your grid paper
    Line up bottom of block with bottom of paper and stamp and
    adhere to the inside of the card
Small Whisper White Piece – Line up Stamp-a-ma-jig  ¾” from bottom of paper (use grid paper)
    Center, ink up stamp, remove the clear sheet, place stamp in the
corner of the Stamp-a-ma-jig and stamp (use other side of paper if you need a do over)

EMBOSSING AND CUTTING
Large Gray piece-- Using the Honeycomb folder, run through the Big Shot on tab 1
Small Gray Piece-- Using the Hearts a Flutter heart framelit cut on tab 2

Adhere embossed piece to card front
Assemble next layer--  
               Gray rectangles onto red square, DSP and stamped piece onto gray pieces
               Outline heart with white gel pen and add pearl, adhere to DSP with Dimensionals
               Tape long ribbon piece to the back of the red piece, tie shorter piece around longer

Punch 3 small flowers, adhere a pearl to the center of each, use a glue dot to adhere below sentiment. Start in the middle to help with placement adhere with Dimensionals


Hershey’s Kisses Valentine’s Heart
Sorry there is no photo BUT if you go the link below there are photos and instructions. At first glance it may look difficult but it is easy!
Supplies I used:
Real Red 12” x 12”                            12” x 2”, 5”x 3”, scraps
Basic Gray                                           ¼” strip
Small Heart Punch
Tree from Merry Minis Punch Pack
Scoreboard
Sticky Strip
Multi Purpose Liquid Glue


Friday, February 1, 2013

Projects from January's Stamp Club

Desk-top Calendar

 
  Supplies:
Pen holders
Clear acrylic frames 7”x5”
Sticky notes
Pens
Summer Smooches designer series paper cut 7”x5”
Solid card stock to match patterned card stock 2 3/8” square
Stapler or repositionable  adhesive
Adhesive
Instructions:
1. Print calendar, cut, stack and staple with the months in order.
2. Remove outer covering and insert from acrylic frame.
3. Slide designer series paper into frame, paying attention to the direction of the pattern on the paper. Keep in mind the frame is lazy and lying down.
4. Adhere calendar to 2 3/8” square.
5. Decide placement of calendar, sticky notes and pen holder and adhere.


Thank You Snow Much


                                                                               envelope


Supplies:

Snow Much Fun Stamp Set
Basic Black card stock                            cut at 8 ½” x 5 ½” and 2 3/8" scallop circle
Pool Party                                                 cut at 4” x 5 ¼”, 7/8” x 4”
Whisper White                                          cut at 4 ½” x 3 ¼”
1 ¾” Circle Punch                                    
2 3/8” scallop Circle Punch
Northern Flurries Embossing Folder     
A2 envelope
Dimensionals                                           
Glossy card stock
Adhesive                                                  
Memento Tuxedo Black Ink
Copic markers                                          B34, YR04, B00, BG10, BG15

Instructions:

1. Cut Glossy card stock to 3” x 4”. This is enough to stamp and cut 2 snowmen.

2. Stamp snowman at the bottom on the short side, lining up the bottom of his hat with the edge of the glossy card stock. (Sassy Girls- using the blue line to line up with the bottom on the short side of the glossy card stock).

Stamp optional envelope with bird rolling on snowball (line up bottom of block with bottom of envelope).

3. Cut all card stock pieces and print sentiment (previously made on the computer). Cut printed sentiment at 5/8” x 3 ½”.
Punch scallop circle. Fold Basic Black piece in half, forming and A2 card.

4. Place Pool Party piece in Northern Flurry embossing folder and through the Big Shot on Tab 1. Adhere to card base. Adhere scallop circle onto Pool Party.

5. Color snowman: nose-YR04; hat, scarf, and buttons-BG10 and BG15; use B00 for shadows.  Adhere liner to inside of envelope. Color envelope: bird-B34; beak YR04; shadows B00.

6. Punch out snowman with circle punch and adhere to scallop circle with dimensional.

7.  Adhere Whisper White to the inside of the card.

8. Cut a notch to the right of the sentiment and adhere to the strip of Pool Party. Cut an outline of the sentiment notch in the Pool Party and adhere to the inside of the card.
 
Valentine Treat


 *The heart was left blank to write a recipients name on at a later time.
Supplies
More Amore Specialty Designer Series Paper              
Pool Party Card Stock                                                        
Primrose Petals Card Stock                                              
Real Red Card Stock                                                         
Very Vanilla Card tock                                                       
½ Inch Very Vanilla Seam Binding                                 
Full Heart Punch                                                                
1 ¾ Inch Scallop Circle Punch                                        
1 3/8 Inch Circle Punch                                                     
Two Tags Bigz Die  
Adhesive, dimensionals, thread
Big Shot
Mini Hershey bars
Instructions
1. Cut Real Red at 8 ½” x 2 ½” and fold in; half so it measures 4 ¼” by 2 ½”.
2. Run through the Big Shot using the Two Tags die (the scalloped top tag), placing the fold of the card stock above the bottom (straight) cutting line.
3. Fold the front scalloped piece down, just below the bottom scallops and burnish with a bone folder.
4. Punch 2 scallop circles form Pool Party or Primrose Petals card stock.
5. Cut 1 circle from the Very Vanilla card stock.
6. Cut a 2 ½” x 1 ½” rectangle from the More Amore SDSP.   
7. Adhere rectangle under the folded scallop.
8. Adhere scallop circles to the scallop parts of the tag. For the bottom scallop, put the adhesive to the tag part so you do not glue it to the back! How do I know this….
9. Adhere circle to the bottom scallop circle.
10. Place pop dots to back of the heart and adhere to the circle.
11. Put candy in the inside of the folded tag.
12.  Wrap ribbon around under the bottom scallop, ends to one side of the tag.
13.  Tie ribbon ends together with thread.